
GST & taxes
GST in Ledgerly lives inside the accounting engine — it's applied when documents post, not patched on at export time.
How GST is applied
- Place of supply decides the split: same state as your company → CGST + SGST; different state → IGST. Ledgerly selects this automatically on every invoice.
- Transaction types get their statutory treatment: Export / SEZ is always IGST; Nil-rated, Exempt and Non-GST supply are always 0%. Those last three are separate choices rather than one, because GSTR-1 reports them in three different sections — the tax is the same, the return is not.
- Input vs output GST post to separate ledger accounts, so what you owe and what you can claim never blur together.
Set your GSTIN under Settings → Company Profile — it appears on invoices and in your GSTR-1 export.
GST summary
GST & Tax → GST Summary shows the period's position at a glance: output GST collected on sales, input GST paid on purchases, split by CGST/SGST/IGST.
Tax ledger
GST & Tax → Tax Ledger is the transaction-level view — every GST posting with its source document, if you need to trace a number.
GSTR-1 export
GST & Tax → GSTR-1 generates your outward-supplies return from posted invoices:
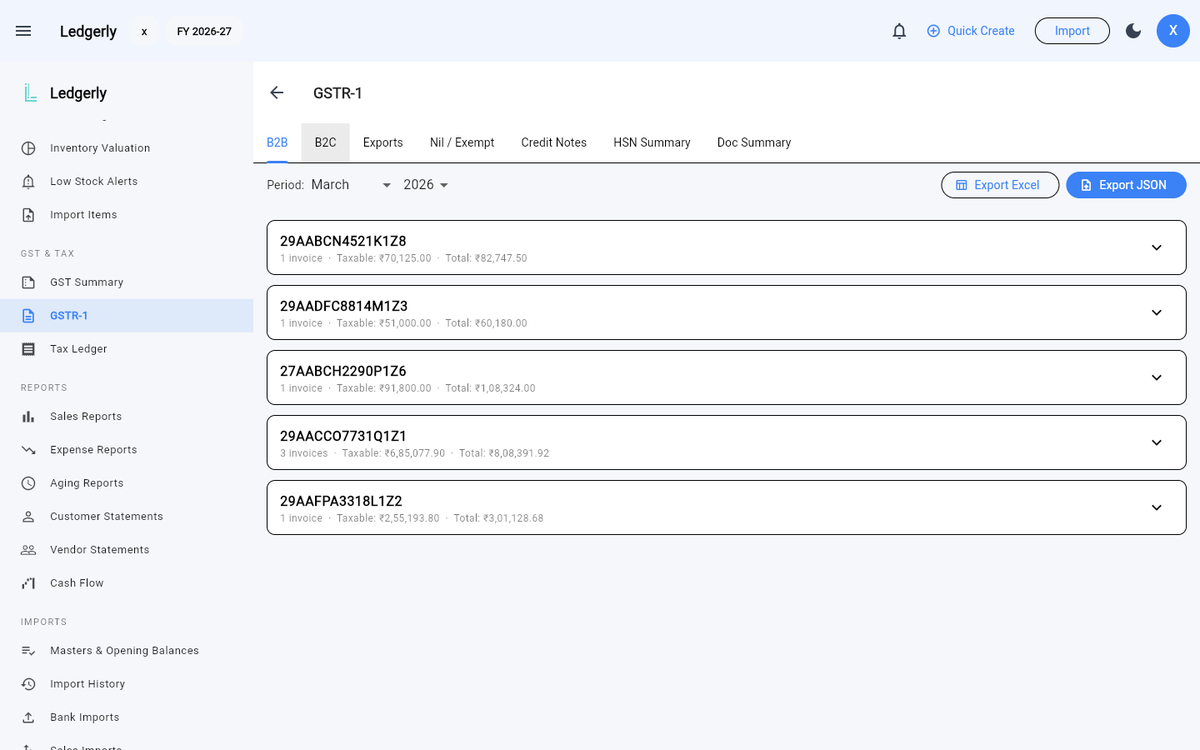
GST & Tax → GSTR-1 — B2B supplies grouped by GSTIN, with Excel and portal-JSON export.
- Pick the month or quarter.
- Review the breakdown across the eight tabs — B2B (registered buyers, with GSTIN), B2C (consumers), Exports, Nil / Exempt, Credit Notes, HSN Summary, Doc Summary, and Problems.
- Export as JSON (upload it directly to the GST portal's offline tool) or Excel (for review or your accountant).
The Problems tab
Ledgerly checks every document in the period and puts what it finds on the Problems tab, in two groups:
- Would make the return wrong or rejected — errors. These block the JSON export, because that is the file you actually file.
- Worth reviewing before filing — warnings. These don't block anything, but a reviewer will ask about them.
Each row names the document and opens it when you click through, so you can fix it and come back. A finding about the return as a whole rather than one document — a company GSTIN that fails its check digit, say — shows as This return and isn't clickable.
The coloured chip at the top of the page carries the count, and tapping the chip takes you to the Problems tab. On a phone that's the practical way in, since Problems is the eighth tab and sits off the right edge until you drag the tab bar.
Typical checks: the company GSTIN must pass the GSTN check-digit test, every invoice needs a place of supply that maps to a real state code, a B2B invoice needs a valid customer GSTIN, and a reverse-charge invoice must not also be charging GST.
The Excel export goes ahead even with errors outstanding, so you can work through the problem rows in a spreadsheet.
These are Ledgerly's own checks. The file is not validated against a schema published by GSTN — the portal's offline tool remains the final word on whether a return is accepted.
Doc Summary, and gaps in your numbering
The Doc Summary tab is Table 13 of the return: the range of document numbers you issued in the period, and how many of them. Six columns — Document Type, From, To, Issued, Cancelled, Net. Cancelled documents are declared, not hidden, which is the whole point of the table.
Because Table 13 declares a range as issued, a hole inside that range is something a reviewer notices. Ledgerly looks for holes and warns you on the Problems tab about three kinds:
- Still a draft — the number is taken but the document is neither reported nor cancelled in this return. Post it or discard it before filing.
- Missing from the series — no document with that number exists at all.
- Dated in another period — the number sits inside this period's range but the document is dated elsewhere, so this return's range has a gap that the other period's return fills.
All three are warnings, not errors. A gap is often perfectly explicable — the number may have gone to a document type this return doesn't cover. What you don't want is to file a range with a silent hole in it and hear about it from a notice.
Tip: invoices only enter GSTR-1 once posted. Drafts are ignored, so post everything for the period before exporting — the draft warning on the Problems tab is there to catch the ones you forgot.
Marking a return as filed
Once you've uploaded the return to the portal, tell Ledgerly. The chip beside the period reads Mark as filed until you do — tap it, and it becomes Filed, with the date it's filed through on hover. You can also use the Mark as filed action on the notification that appears after a JSON export.
What this does and doesn't do is worth being precise about:
- It records that the return went to the portal. Everything dated on or before the period end then reads as filed, here and in the audit trail.
- It does not file anything. Ledgerly has no connection to the portal. You still upload the JSON yourself.
- It does not lock the period. Entries can still land in a filed period. To stop that, close the period under Settings → Financial Years.
Filing is one watermark for the whole book, not a flag per period. Marking September filed also declares August filed — so mark periods filed in order, and don't skip one you haven't actually filed.
To withdraw the claim, tap the chip again and choose Un-file. This asks for a reason, which is recorded against the period in the audit trail — someone is stating that a return was not filed after all, and that statement should have a name and a reason attached. Un-filing moves the marker back to just before the period started, so this period and everything after it stop reading as filed; earlier periods are untouched.
Why it matters: corrections go to Table 9A
Marking periods filed isn't bookkeeping hygiene — it changes where your corrections are reported.
When you raise a revised invoice against an original, Ledgerly asks which invoice it revises and on what date. What happens next depends on whether that original fell in a period you've marked filed:
- The original was in a filed period → the correction is an amendment, and goes to Table 9A (
b2ba) of the current return. Table 9A restates a document the portal already has. - The original was in a period not yet filed → there is nothing at the portal to amend, so the correction simply rides in the current return as an ordinary invoice.
Get the filed marker wrong and the return is wrong in a way that's tedious to unpick: an amendment declared against a supply the portal never received, or a correction quietly folded into the current period when the portal is expecting an amendment. This is the reason the chip is worth a tap each month.
Documents Ledgerly issues
The GST rules prescribe a different document for each thing that can happen, and getting the wrong document right is still wrong. Ledgerly issues these, each with the particulars its rule requires:
| Document | When you use it |
|---|---|
| Tax invoice | An ordinary taxable supply. |
| Bill of supply | Everything on it is exempt, nil-rated or non-GST, or you are not charging tax. |
| Invoice-cum-bill of supply | One unregistered buyer taking taxable and exempt goods together — one piece of paper instead of two. Ledgerly blocks this for a buyer with a GSTIN, who needs a tax invoice to claim credit. |
| Revised invoice | Supplies you made between your registration taking effect and your certificate being issued. It prints "Revised Invoice" prominently and must name the number and date of the document it revises — Ledgerly asks for both before it will post one. |
| Credit / debit note | A reduction or increase against an invoice already issued. |
| Receipt voucher | You took money before making the supply. Issue it when the advance arrives, not when the goods go. |
| Refund voucher | That advance is going back because the supply will not happen. The tax you paid on the advance is reversed with it. |
| Delivery challan | Goods are moving but not being sold — sent for job work, transferred between your own premises, or out on approval. Prints in triplicate, marked for consignee, transporter and consigner, as the rules require. |
| Payment voucher | You are paying a supplier on a purchase where you owe the GST, not them. Raised against a reverse-charge bill from Purchases → Payment Vouchers. |
Two things about the last three are worth knowing before you need them.
An advance is a liability, and it is taxed. GST on an advance is payable when you receive it, not when you supply. If you cannot yet tell what rate will apply, the rules set 18%; if you cannot yet tell whether the supply will be within your state or outside it, they treat it as inter-State. Ledgerly applies both fallbacks and prints on the voucher which one it used and why, so the figure is defensible a year later. The advance shows as unadjusted until you either release it against an invoice or refund it.
A delivery challan posts nothing to your books. Ownership has not changed — only location has — so there is no sale, no output tax and no journal entry. Raise a tax invoice when the supply actually happens. If you are sending goods for job work, note that they must come back within a year (three for capital goods) or the movement becomes a supply; Ledgerly counts your open job-work challans on the Delivery Challans screen for exactly that reason.
A payment voucher posts nothing either. The liability was booked when the reverse-charge bill posted, and the payment to your supplier is recorded by the ordinary vendor-payment flow. The voucher evidences your own liability at the moment of payment, which is what Rule 52 asks for — issuing it does not create a second obligation. Only reverse-charge bills are offered: a supplier who charged you tax normally has issued their own tax invoice, and no voucher arises.
Purchases where you owe the tax
On most purchases your supplier charges GST and you claim it as input credit. Under reverse charge the obligation flips: the supplier charges nothing, and you pay the tax to the government yourself.
Tick Reverse charge on the bill and Ledgerly posts both halves of that, which is what makes the treatment correct rather than approximate:
- The tax you now owe is credited to RCM Payable — accounts
2240(CGST),2250(SGST) and2260(IGST). - The matching input tax credit is debited to Input CGST / SGST / IGST (
1210/1220/1230).
You owe it and you can claim it, and both appear in your books the moment the bill posts. Then raise the payment voucher from Purchases → Payment Vouchers when you pay.
On the outward side the same flag means the opposite thing: an invoice you raise under reverse charge must not charge GST, because your customer pays it directly. Ledgerly refuses to post such an invoice with tax on it, rather than quietly zeroing the lines — the document and the ledger would otherwise disagree about what the customer owes. Set every line to 0%; the invoice still carries the reverse-charge declaration.
ITC register
GST & Tax → ITC Register is the tax-period view of your input tax credit — what GSTR-3B Table 4 would be assembled from.
Its most useful output isn't any of the amounts. It's the count of credit that was never classified: Ledgerly names and separates it rather than quietly folding it into the claimable figure. Credit you haven't classified is credit you can't defend, and the register says so plainly.
Classification runs on the two axes the rules apportion on:
- What was bought — inputs (goods consumed in the business), input services, or capital goods (where credit spreads over the useful life Rule 43 prescribes rather than being taken at once).
- Whether the credit may be taken — eligible (wholly for taxable supplies), ineligible (blocked by section 17(5), or non-business — a cost, not an asset), or common (taxable and exempt together, which Rules 42/43 apportion).
Set both on the bill. Each line carries its own classification, and the bill has a default you can set once and let the lines inherit.
Unpaid suppliers. Where a bill has gone unpaid for more than 180 days, section 16(2)'s second proviso — given effect by Rule 37 — reverses the credit you already took. Ledgerly ages your bills against that clock and badges the overdue ones on Purchases → Payables. It warns; it does not post the reversal. You make that entry yourself.
What Ledgerly does not do
Ledgerly prepares your outward-supplies position. Several GST obligations sit outside that, and it is better you know now than at an audit.
E-invoicing. Ledgerly does not report invoices to the Invoice Registration Portal, so it cannot produce an IRN or the QR code that must then appear on the invoice. Above the e-invoicing turnover threshold this matters a great deal: an invoice without an IRN is not a valid tax invoice, and your customer cannot claim input tax credit against it. Declare your aggregate turnover under Settings → Company Profile and Ledgerly will tell you where you stand.
E-way bills. Ledgerly does not generate them. Moving goods above the consignment-value threshold needs an e-way bill raised before the movement starts. Generate it on the e-way bill portal and record the number on the invoice — there is a field for it.
Returns other than GSTR-1. GSTR-3B, the annual return (GSTR-9 / 9C) and the composition returns are not produced today.
Input tax credit reversals. Ledgerly classifies input tax credit and tracks it (see below), and it warns you when a supplier has gone unpaid past 180 days. It does not post the reversal entry that Rule 37 then requires — you make that entry yourself. Nor does it compute the Rule 42/43 apportionment of common credit between taxable and exempt supplies.
Registration types. Ledgerly assumes a regular registration. Composition dealers are not supported.
If any of these apply to you, use Ledgerly alongside your GST practitioner or portal workflow rather than in place of it.
Rounding
Invoice and bill totals are rounded to the nearest rupee, and the adjustment appears as a separate Round Off line on the document and in your ledger, posted to its own account. Tax amounts themselves are not rounded — the tax charged is the tax computed.
This is ordinary commercial practice and it means the document adds up to the amount your customer actually pays. It is a deliberate choice rather than a statutory requirement, and it is disclosed here because your accountant may want to know which convention you are on.